
I’ve always been interested in books and their construction, even at an early age. I remember in high school (back in the mid/late 90’s) I carefully studied various books I had on hand to try and identify the steps needed to take on such a task. This was prior to the internet folks!
With my meager supplies – a regular sewing needle, thread and some general all purpose printing paper – I endeavored to stitch the individual pages together. I then glued them inside a cardboard cover overlaid with fabric then attached some accent paper to the front and back of the book.
The results were needless to say messy and not near the professional quality of an experienced and knowledgeable crafts-person. However for having figured it out all on my own, I feel that I did a fairly decent job. Unfortunately that project has long since disappeared, probably lost in the multiple moves over the years, but the memory of that project stayed with me.
I had recently been printing and tea staining “cliff notes” for my current Dungeons & Dragons character. Keeping these easy to reference notes in a binder I feel is much more helpful than constantly flipping through and bookmarking all of the pages I needed to constantly look at in the player’s manual during game play. As a Tiefling Warlock, a spell book should have all of the necessary information readily on hand and available at the flick of a tail.
My crafty mind wanted to take this to the next level of creativity and dedication. Why not create an actual spell book, I thought! The memory of my younger self crashed headlong into the current and more knowledgeable self, now with access to the world wide web. I was unstoppable. Diving headlong into this new task, I conducted some research, gathered the basic tools and supplies needed and secluded myself for several days.
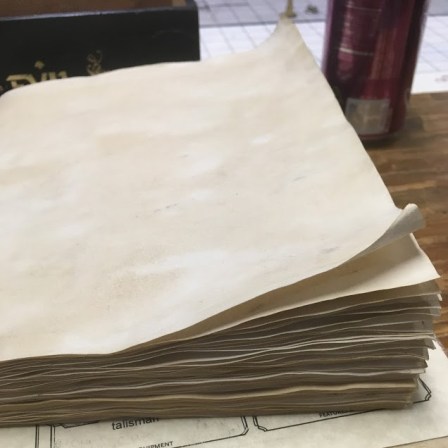
tea stained paged, folded into signatures
In the kitchen, I brewed a massive amount of tea and cranked out a large amount of plain/unprinted tea-stained pages, two at a time. This took several evenings. Next the glue and supplies arrived and after a test run, realized that regular, thinner sewing thread was much preferable to the thicker, waxed cord that was provided in my bookbinders kit. It worked out as the red thread I already had perfectly accented the color scheme I had in mind.
After appreciating the crinkly paper much like a cat enjoys a paper bag, I folded the pages into “signatures”. Prior to sewing them, I hand wrote all of my character’s current notes making sure to carefully space out how many blank pages to leave between sections to add additional notes for the future. I did this with two of my favorite fountain pens (Lamy LX limited edition gold with EF nib and my TWSBI mini with a 1.1 mm stub nib – for section titles; ink: Diamine “Oxblood”). No penciled in guide lines were added; I did this all by eye. I also added a few artistic flourishes/images to break up the text and add to the creepiness of the book.
Once the signatures were sewn, I took inspiration from a recent reddit post on r/Antiques where someone posted an image of a book from the 1800’s that used an old map for the reinforcement. How cool is that? Think of the history; these guys used whatever they had on hand. I followed in their footsteps and re-purposed some discarded/old pages from my old binder notes to reinforce my “text block”

Photo credit: https://www.reddit.com/r/Antiques/comments/8r4vi1/old_1840s_book_with_a_map_in_the_binding/
“Headbands” (not the type you tie your hair up with) became an obsession. These are optional accent pieces of fabric that are attached the top and bottom of the book between the cover and the “text block” to prevent dust from settling down in the spine while shelved. In true Twigg form, I wanted a very specific style and color scheme. Unable to find a local source, I found some old ribbon and proceeded to sew my own. There wasn’t a great deal of information online about how to do this; most were pre-made or actually stitched to the “text block” itself. It wasn’t perfect, but I achieved my goal.
After attaching my homemade “headbands” I immediately realized this should’ve been done prior to adding the “text block” reinforcement. Oh well! You live, you learn. Turns out it wasn’t that big of a deal and you really don’t even notice this on the finished project.
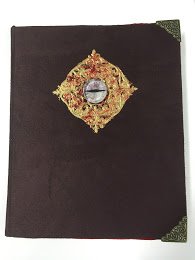
I picked up some suede-like scrap material at Joanns to keep with the whole creepy tactile theme. Utilizing some thick cardstock I already had on hand, I glued the fabric down. In retrospect, I will plan on using a more sturdy material as the heavy card is just a little too flexible for my tastes. (Fun fact: It was a good thing I invested in the large glue bottle. You go through that stuff like crazy!) Next I cut/trimmed some red accent paper for inside front and back of the book. This paper also has a rather strange, soft feel to it. I honestly can’t explain it but it’s neat!
The final touches were attaching metal accent corners, painting and gluing an applique to the upper/center cover and finished it off with a handmade 1” glass eye.
All in all I’m very happy with the end result. I wish I could go back in time and show my younger self what I can look forward to! I can’t wait to make my next book.
Be crafty folks! It’s a wonderful world out there. Make it your own.
~*Twigg*~
click on the images in the Gallery below for full size view and info.
Gallery


